A voided check is used to set up direct deposits or bill pay. Simply write “VOID” across the pay to the order of line. Also, write “VOID” in the payment amount box and the signature box.
Use this step-by-step guide to get it right every time.
Before you get started, make sure to use a blue or black gel pen to keep the information clear and help protect yourself against fraud.
Step 1
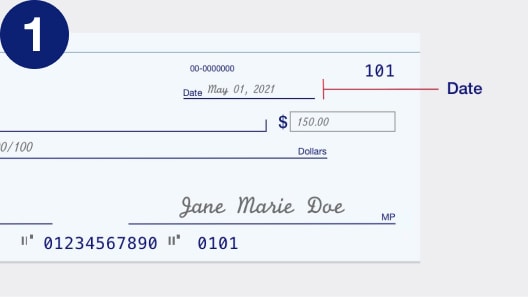
Date the check
Add the date of when you wrote the check on the line at the top right-hand corner. This is important so the bank and the person you are giving the check to knows when you wrote it.
Step 2
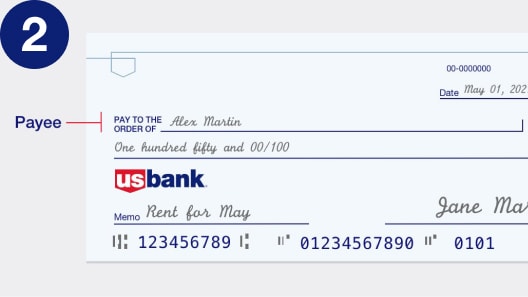
Tell the bank who to pay.
Find the “Pay to the order of” field and write the recipient’s full name. It’s important to write this clearly and accurately.
Step 3
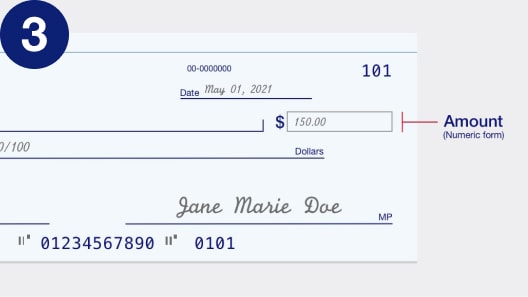
Write your payment amount in numbers
Use the small box to the right to indicate your payment amount in dollars and cents numerically (i.e. $130.45).
Step 4
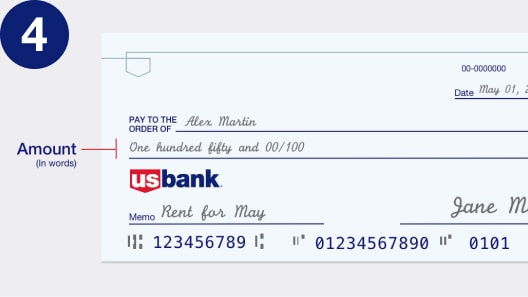
Spell out your payment amount in words
Write the payment amount in words on the line below the recipient’s name. This must match the numerical dollar amount you wrote in the box. However, be sure to write the cents amount as a fraction over 100 (i.e. 10 cents = 10/100)
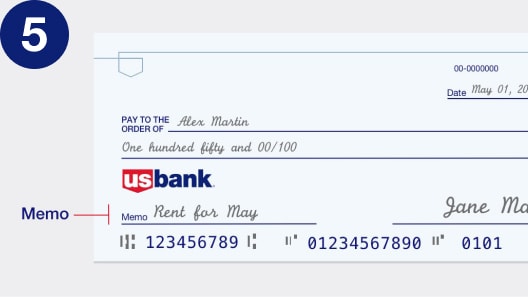
Step 5
Use the memo field
Writing a memo is optional but helpful later to know what the check is for. For example, write “monthly rent” to help keep track of rent expenses. An image of the check is available in online and mobile banking. This is especially helpful during tax season.
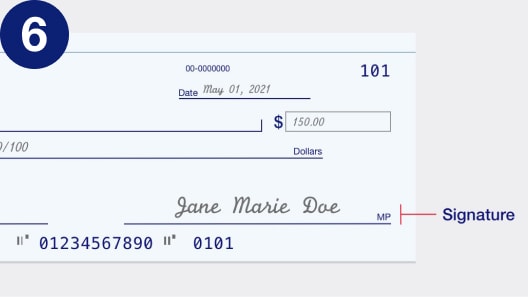
Step 6
Sign the check
Lastly, but most importantly, sign your name on the line at the bottom right-hand corner. Typically, a check cannot be deposited or cashed without your signature.
How to balance a checking account.
Keep track of your account balance to avoid bouncing a check and to avoid an overdraft fee. Best practice is to compare your checkbook register and bank account statement as well as any unlisted deposits and outstanding checking/withdrawals. If they match, your checking account is balanced.

Looking for a checking account for teens?
If you’re 13 through 17 years old, we’ve got special account benefits and features just for you. A checking account is a great way to teach kids financial responsibility. You can open a Bank Smartly Checking account for a minor aged 13 through 17 if it is a joint account with an adult. You may do so together online or in a branch.
Build a solid financial foundation.

Questions students should ask about checking accounts.

Banking basics: Building credit

Building confidence in your finances and career: Lessons from two fitness pros
Frequently asked questions
You may want to write a check to yourself to withdraw cash from your bank account or transfer money between accounts. Simply write “Cash” in the pay to the order of line.
You can apply for an individual bank account if you’re 18 years or older and a legal U.S. resident. You’ll need to provide your Social Security number and a valid, government-issued photo ID. Those aged 13 through 17 can open a joint account with a parent or guardian.
Set up direct deposit in three simple steps – our automated setup is fast, secure and gives you access to your money the same day.
There are multiple places, including: the U.S. Bank Mobile App, online banking, your monthly statement, your checkbook and our routing number directory. The easiest way is to open the app and simply ask the U.S. Bank Smart Assistant, “What’s my routing number?”
Reordering checks couldn’t be easier. You can also customize your checks. There are multiple ways, including through: The U.S. Bank Mobile App, online banking, by phone or a branch.
With the U.S. Bank Mobile App, you can deposit a check anytime. Take a photo with your Smart Phone and upload it through the mobile app.
Always use your checks with people and organizations you trust. If mailing your check, deposit it in a secure mailbox inside a USPS facility.
Get the latest information to help keep your finances secure.
Learn more about account services, features and benefits on our Customer services page.

